Adapting Three.js Toon Shader for Cartoon-y 3D Dice
In this installment of our series on shader programming we show you how we modified the toon shader code on Three.js to create cartoony dice that have outlined faces.
Last time we explained how we added the fade in effect for hidden rolls, and we will start with something similar here.
You might recall that last time I got lazy and didn't want to bother sampling the colors of each die texture to turn that into the diffuse color. Well this time, we don't have any already made textures s. So let's do this the right way from the outset!
Diffuse color is already parameterized in the shader, but if we could only parameterize the number color, we could make a ton of different variations just with the manifest file! The way to do that is color math. We made a texture where the numbers are white and the background is transparent using an alpha channel. With this we can make a number color uniform, multiply it by this texture and overlay it on the diffuse color using the alpha channel.
Here is the sample texture:
Here is the base toon frag shader from three.js
#define TOON
uniform vec3 diffuse;
uniform vec3 emissive;
uniform float opacity;
#include <common>
#include <packing>
#include <dithering_pars_fragment>
#include <color_pars_fragment>
#include <uv_pars_fragment>
#include <uv2_pars_fragment>
#include <map_pars_fragment>
#include <alphamap_pars_fragment>
#include <alphatest_pars_fragment>
#include <aomap_pars_fragment>
#include <lightmap_pars_fragment>
#include <emissivemap_pars_fragment>
#include <gradientmap_pars_fragment>
#include <fog_pars_fragment>
#include <bsdfs>
#include <lights_pars_begin>
#include <normal_pars_fragment>
#include <lights_toon_pars_fragment>
#include <shadowmap_pars_fragment>
#include <bumpmap_pars_fragment>
#include <normalmap_pars_fragment>
#include <logdepthbuf_pars_fragment>
#include <clipping_planes_pars_fragment>
void main() {
	#include <clipping_planes_fragment>
	vec4 diffuseColor = vec4( diffuse, opacity );
	ReflectedLight reflectedLight = ReflectedLight( vec3( 0.0 ), vec3( 0.0 ), vec3( 0.0 ), vec3( 0.0 ) );
	vec3 totalEmissiveRadiance = emissive;
	#include <logdepthbuf_fragment>
	#include <map_fragment>
	#include <color_fragment>
	#include <alphamap_fragment>
	#include <alphatest_fragment>
	#include <normal_fragment_begin>
	#include <normal_fragment_maps>
	#include <emissivemap_fragment>
	// accumulation
	#include <lights_toon_fragment>
	#include <lights_fragment_begin>
	#include <lights_fragment_maps>
	#include <lights_fragment_end>
	// modulation
	#include <aomap_fragment>
	vec3 outgoingLight = reflectedLight.directDiffuse + reflectedLight.indirectDiffuse + totalEmissiveRadiance;
	#include <output_fragment>
	#include <tonemapping_fragment>
	#include <encodings_fragment>
	#include <fog_fragment>
	#include <premultiplied_alpha_fragment>
	#include <dithering_fragment>
}
We then add a new texture to this called `u_numberMap`, a color uniform `number`, and the `hiddenness` uniform.
@@ -1,7 +1,15 @@
 #define TOON
+#define USE_UV
 uniform vec3 diffuse;
 uniform vec3 emissive;
 uniform float opacity;
+uniform float hiddenness;
+uniform sampler2D u_numberMap;
+uniform vec3 number;
 #include <common>
 #include <packing>
 #include <dithering_pars_fragment>
@@ -32,6 +40,19 @@ void main() {
     vec3 totalEmissiveRadiance = emissive;
     #include <logdepthbuf_fragment>
     #include <map_fragment>
+
+    vec4 u_numberMapIn = texture2D(u_numberMap, vUv);
+    // adjust color of numbers
+    u_numberMapIn.rgb *= number;
+    // overlay number map and apply hiddeness
+    diffuseColor.rgb = mix(diffuseColor.rgb, u_numberMapIn.rgb, u_numberMapIn.a * (1.0 - hiddenness));
+
     #include <color_fragment>
     #include <alphamap_fragment>
     #include <alphatest_fragment>
`u_numberMapIn.rgb *= number;` is the line of code that changes that all white numbers into the color passed in via the `number` uniform. We then apply `hiddenness` in a similar way to last time, but instead we use the really real diffuse color and not our fakey one.
This gives us the added benefit that we could use the regular old `map` uniform to do texture or diffuse mapping and then our colored numbers will be nicely layered on top!
We put this all together with a manifest file as shown here:
{
   "id": "dddice-toon",
   "version": "1.0.0",
   "api_version": "2.0",
   "name": "Toon",
   "description": "",
   "label": {
     "color": "#000000",
     "background_color": "#42a832"
   },
   "frag_shader": "shader.frag",
   "vert_shader": "shader.vert",
   "textures": [
     {
       "binding": "u_numberMap",
       "src": {
         "d4": "numbers.png",
         "d6": "numbers.png",
         "d8": "numbers.png",
         "d10": "numbers.png",
         "d10x": "numbers_d10x.png",
         "d12": "numbers.png",
         "d20": "numbers.png"
       }
     }
   ],
   "uniforms": {
     "diffuse": {
       "type": "color",
       "value": {
         "r": 0.031,
         "g": 0.353,
         "b": 0.0
       }
     },
     "number": {
       "type": "color",
       "value": {
         "r": 1.0,
         "g": 0.929,
         "b": 0.0
       }
     }
   }
 }
This results in a die that looks something like this:
There there is this odd wiping effect going on, that's because by default the toon shader uses 2 tone shading, this works ok but our situation would benefit for more levels. So we will use a gradient map. This is a n x 1 dimensional texture that defines how many levels of gray to use in the shading. We made a 5 level one and added it to the manifest.

  "textures": [
     {
       "binding": "u_numberMap",
       "src": {
         "d4": "numbers.png",
         "d6": "numbers.png",
         "d8": "numbers.png",
         "d10": "numbers.png",
         "d10x": "numbers_d10x.png",
         "d12": "numbers.png",
         "d20": "numbers.png"
       }
-    }
+    },
+    {
+      "binding": "gradientMap",
+      "src": "fiveTone.jpg"
+    }
    },
Unfortunately this results in a die with sides that are hard to see the edges of. This is just part of thr deal with toon shading. In normal cell animations they handle this with outlining, so let's do that!
 #define TOON
 #define USE_UV
+varying vec2 vUvOverlapped;
+varying vec2 vUvPacked;
 uniform vec3 diffuse;
 uniform vec3 emissive;
 uniform float opacity;
 uniform float hiddenness;
+uniform sampler2D u_outlineMap;
 uniform sampler2D u_numberMap;
 uniform vec3 number;
+uniform vec3 outline;

...

    #include <logdepthbuf_fragment>
    #include <map_fragment>

+    vec4 u_outlineMapIn = texture2D( u_outlineMap, vUvOverlapped );
+    // adjust color of outline
+    u_outlineMapIn.rgb *= outline;
+    // overlay outline map over diffuse color or map
+   diffuseColor.rgb = mix(diffuseColor.rgb, u_outlineMapIn.rgb, u_outlineMapIn.a);

     vec4 u_numberMapIn = texture2D( u_numberMap, vUv );
     // adjust color of numbers
Here we added an extra set of UV coordinates. All our die models have 3 sets, the primary one used to align the numbers on the faces, one that with all faces maped to the same coordinates, and one that has a tesilation pattern.
For the outlining, we will use the 2nd uv which has all the faces maped the same, and make some outlines one for each face shape.

We use the same white / alpha trick so we can control the colors from the manifest file via the `outline` uniform.
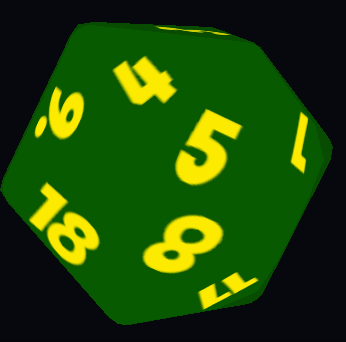
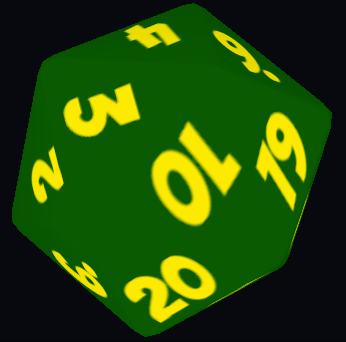
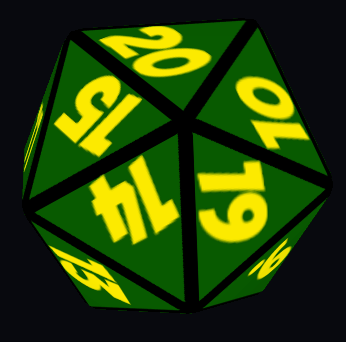
This results in a die like this, a cartoony die!
All the effort on the color math is worth it because with it, all of you can select your own colors for the various elements in our editor! Why not try it out now?
You could also download this zip with all the shader code, assets and manifest file, hack around with it, then upload your own die with our API!
If you're interested in joining our growing community, join our Discord, follow us on Twitter, join the subreddit, and stay tuned for more updates.